Quick answer: to level an RV, check the site’s slope with a bubble level or leveling app, then level side to side first by driving the low-side wheels onto leveling blocks or ramps, and chock the wheels. For a towable, unhitch and use the tongue jack (travel trailer) or landing gear (fifth wheel) to level front to back; for a motorhome, use its leveling jacks or blocks under the tires. Only after the RV is level should you lower stabilizer jacks, which steady the RV but are not designed to lift it. Many RV owner’s manuals call for being close to level for the refrigerator, slide-outs and doors to work properly, so check your manual for its specific limits.
Leveling is one of the first setup jobs at every campsite, and it is easy to skip when you are tired after a long drive. It is worth doing, though. A level RV is more comfortable to sleep in, keeps doors and drawers from swinging open, helps slide-outs and leveling systems operate as designed, and, in RVs with absorption refrigerators, helps the fridge work properly.
This guide explains how to level travel trailers, fifth wheels and motorhomes, along with the tools and common mistakes. For the bigger picture on RV types and setup, see our RV and van camping guide.
Sources: RV and appliance manufacturers’ owner’s manuals (leveling, refrigerator and slide-out sections); RV Industry Association (RVIA) consumer resources; National Park Service and state park campground rules on site use. Checked October 2026. Always follow your RV’s owner’s manual first, since requirements vary by model.

Why Leveling an RV Matters
Refrigerators
Many RVs use absorption refrigerators, which can run on propane or electricity. These units rely on gravity to move fluids through their cooling system. Refrigerator manufacturers’ manuals typically specify how far out of level the unit can operate, and running one far off level for long periods can reduce cooling and may damage the cooling unit. Residential-style compressor refrigerators, found in many newer RVs, are less sensitive but still benefit from a level setup.
Slide-outs, doors and leveling systems
Slide-outs are designed to operate when the RV is level and properly supported. Operating them while the coach is badly out of level can strain mechanisms and seals. Doors, cabinets and drawers also work better when the RV is level.
Comfort and plumbing
Sleeping with your head lower than your feet is uncomfortable, showers may drain poorly and liquids can pool on counters. Tanks and drains are designed with level in mind.

Tools You Need
- A level: a bubble level on a flat surface inside, bubble levels mounted on the RV’s exterior, or a smartphone app or Bluetooth leveling sensor
- Leveling blocks or ramps: stackable plastic blocks, curved ramp-style levelers or sturdy wood boards
- Wheel chocks: to keep the RV from rolling
- Stabilizer jack pads: to spread the load on soft ground
- A drill with a socket adapter or the supplied crank, for manual stabilizer jacks
- Gloves and a flashlight
If you use wood boards, make them wider than the tires so the whole tread is supported, and avoid stacking blocks into an unstable pyramid. Follow the block manufacturer’s directions on stacking and weight limits.

Before You Start: Choosing and Reading the Site
Pick the flattest part of the site when you park. Small adjustments in where you stop can save a lot of blocking. Many campgrounds post maximum vehicle length and describe how level each site is; our guide to types of RV campgrounds explains what to expect at different parks.
Check the site for soft ground, roots and rocks where blocks and jacks will go. On soft surfaces such as sand or grass, use pads under jacks and blocks so they do not sink.

How to Level a Travel Trailer
- Park in position with the trailer still hitched, close to where hookups will reach. Our guide on RV hookups explained covers water, electric and sewer setup.
- Check side-to-side level with your level at the center of the trailer.
- Place leveling blocks or ramps in front of or behind the tires on the low side, then slowly pull or back onto them with a spotter. Recheck and adjust until side to side is level.
- Chock the wheels on both sides, front and back, before unhitching.
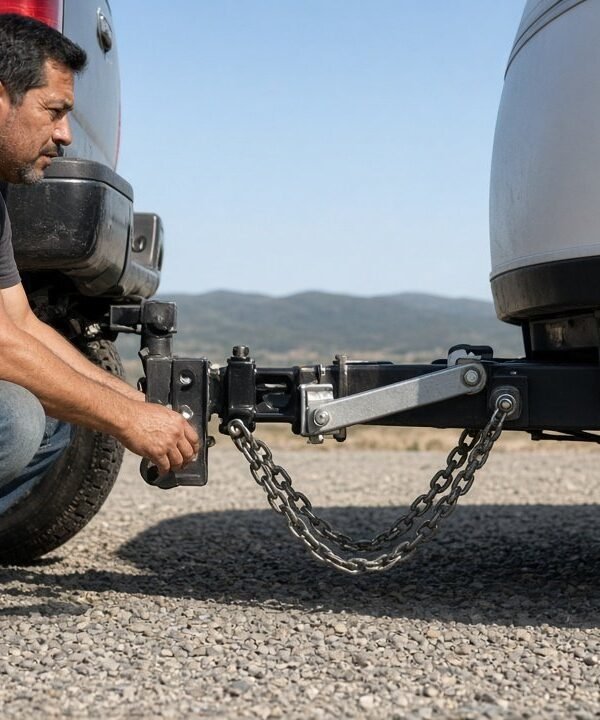
- Unhitch following your normal procedure; our guide to towing a travel trailer for beginners covers safe hitching and unhitching.
- Level front to back with the tongue jack, raising or lowering the front until level.
- Lower the stabilizer jacks at the corners until they make firm contact. They should steady the trailer, not lift it.
- Do a final check with the level inside.

How to Level a Fifth Wheel
Fifth wheels follow a similar process:
- Level side to side with blocks under the low-side tires while still hitched.
- Chock the wheels.
- Lower the landing gear to take the weight, then unhitch following your manual.
- Level front to back with the landing gear.
- Lower stabilizers and do a final check.
Many fifth wheels have powered landing gear and some have automatic leveling systems; follow the manual for your model.

How to Level a Motorhome
With hydraulic or electric leveling jacks
Many Class A and some Class C motorhomes have leveling jacks, often with an automatic leveling mode. Typical steps:
- Park on the flattest spot available, set the parking brake and put the transmission in park.
- Check the manual for requirements such as running the engine during leveling.
- Use automatic mode or level manually with the controls, usually front to back and then side to side, per the manual.
- Put pads or boards under jacks on soft ground.
- Avoid lifting wheels off the ground unless the manufacturer allows it; many manuals warn against it because it can make the coach less stable.
Without leveling jacks
Use leveling blocks or ramps under the low-side tires, driving slowly onto them, then chock the wheels. Front-to-back level can be adjusted with blocks under the front or rear tires.

Leveling Jacks Versus Stabilizer Jacks
This is one of the most common points of confusion for new RVers:
- Leveling jacks, found on many motorhomes and some fifth wheels, are designed to lift and level the RV.
- Stabilizer jacks, found on most travel trailers and many fifth wheels, are designed only to reduce bouncing and sway once the RV is already level and supported by its tires and tongue jack or landing gear.
Using stabilizers to lift the RV can bend them or damage the frame. Always level first, then stabilize.

When You Cannot Get Perfectly Level
Some sites are simply too uneven. If you cannot get within your RV’s specified limits:
- Ask the campground for a different site if possible.
- Prioritize side-to-side level, which is usually harder to tolerate for sleeping and appliances.
- For a short overnight stop, a little off level may be acceptable for comfort, but check your refrigerator manual’s limits.
- Do not stack blocks higher than the manufacturer recommends.
When boondocking on uneven ground, leveling becomes even more important; our guide to RV boondocking for beginners covers choosing sites without hookups.

Leveling on Different Surfaces
The ground under your RV changes how you level and how stable the result is.
Gravel and packed dirt
The most common campground surfaces. Blocks and jacks generally sit well, but loose gravel can shift under ramps as you drive on, so go slowly. A jack pad under each stabilizer keeps it from digging in.
Grass and soft soil
Soft ground can let blocks and jacks sink over time, especially after rain. Use wide pads or boards under every block and jack, check the level again after the first night and avoid parking over low, soggy spots.
Sand
Sand is soft and shifts. Wide boards under the tires and large jack pads help spread the weight. Be careful driving onto ramps in sand, since tires can dig in.
Asphalt and concrete
Hard surfaces are stable, but they can get hot in summer, and hard plastic blocks can slide on smooth concrete. Rubber-backed blocks or a mat underneath help. Some paved surfaces, such as hot asphalt, can be marked by jack feet, so use pads.
Snow and ice
Blocks and wheels can slip on ice. Clear snow down to firm ground where possible, use traction aids and chocks, and recheck level as snow melts.

Leveling Tools: Bubble Levels, Apps and Sensors
Simple bubble levels remain the most reliable and cheapest option, and they need no batteries, no app updates and no signal. Many RVers place a small level on the kitchen floor or counter, ideally near the refrigerator, and use that as their reference.
Smartphone level apps and Bluetooth leveling sensors can show how many inches to raise one side, which saves trial and error with blocks. They are only as accurate as their calibration and mounting, so calibrate them on a known level surface first, and check against a bubble level now and then.
Exterior bubble levels mounted on the front and side of a trailer are handy for quick checks from outside, but they can be bumped out of alignment; confirm their accuracy against your interior level.

Safety Around Blocks and Jacks
- Never crawl under an RV that is supported only by leveling or stabilizer jacks. They are not designed to support someone working underneath.
- Keep hands and feet clear of tires when driving onto blocks, and have a spotter use agreed hand signals.
- Check that the whole tire tread sits on the block, with no part of the tire hanging over an edge.
- Keep children and pets away during leveling and while jacks are moving.

Departure Checklist
Before you drive away, run through a short list:
- Retract slide-outs, following the manual.
- Raise stabilizer jacks and leveling jacks fully, and check the jack indicator if you have one.
- Raise the tongue jack or landing gear after hitching, per your hitching routine.
- Remove wheel chocks and pick up all blocks and pads.
- Walk around the RV once, slowly and with a flashlight if it is dark, to check for anything left behind or still down.

Common Mistakes
- Unhitching before chocking. Always chock before unhitching a towable.
- Using stabilizers to lift. They are not designed for it.
- Driving off the end of blocks. Use a spotter and go slowly; some ramp-style levelers have built-in stops.
- Leveling before checking slide-out clearance. Make sure slides have room for trees, posts and hookups.
- Forgetting to raise jacks before leaving. Make jacks and blocks part of a departure checklist.
- Relying only on the exterior bubble levels. They can be knocked out of alignment; double-check inside.

Frequently Asked Questions
Does an RV need to be perfectly level?
Not perfectly, but close. Many owner’s manuals specify limits for the refrigerator, slide-outs and leveling systems. Check your manual for your RV’s numbers.
Should I level side to side or front to back first?
For towables, level side to side first with blocks while hitched, then chock, unhitch and level front to back with the tongue jack or landing gear.
Can stabilizer jacks be used to level an RV?
No. Stabilizer jacks reduce movement once the RV is level. Lifting with them can bend the jacks or damage the frame.
Is it bad to run an RV fridge off level?
Absorption refrigerators can cool poorly and may be damaged if run well off level for extended periods. Follow the refrigerator manufacturer’s limits.
What can I use if I do not have leveling blocks?
Sturdy, wide boards can work in a pinch, as long as they support the full width of the tire and are stable. Purpose-made blocks or ramps are easier and safer.

The Bottom Line
Leveling an RV takes a few minutes once you have a routine: check the slope, level side to side with blocks, chock the wheels, level front to back with the tongue jack, landing gear or leveling jacks, then lower stabilizers. Follow your owner’s manual for limits, especially for the refrigerator and slide-outs, and add raising jacks and picking up blocks to your departure checklist.